
How to customise your edition to match your branding
Customise your edition’s appearance, messaging, and participant experience to reflect your event branding.
Your edition can be customised in many ways to create a registration experience that matches your event identity.
From background images and logos to colours, fonts, messages, and wording, njuko provides a range of tools and modules to help you build a consistent and professional participant experience.
This guide covers the main branding tools available and where to configure them.
1. Install the recommended branding modules
To fully customise your edition, we recommend installing several branding-related modules from the Store.
Some customisation options are included by default, while others require dedicated modules.
1.1 Recommended modules
Search for and install the following modules as needed:
-
Custom background image
-
Custom front navigation
-
Custom sender email address
-
Customise select competition page
-
Custom font (front only)
-
Registration workflow manager
💡 Tip
Not all modules are mandatory. Install only the ones relevant to the branding and participant experience you want to create.
2. Customise the visual identity of your edition
Several design elements can be configured to align your edition with your event branding.
This includes:
-
Background image
-
Logo
-
Theme colours
-
Fonts
2.1 Customise the background
Go to:
Setup → Edition settings → Advanced options
Here you can upload a custom background image for your edition.
You can:
-
Upload your own image
-
Use one of the default preset images
-
Create a simple colour background by uploading a solid colour image
Recommended image size:
- Maximum width around 2000px
⚠️ Important
If an image does not upload, it is usually because the file size is too large. Resize or compress the image before uploading.
Once saved, the background will automatically appear on the front office pages.
2.2 Add your logo and manage the edition title
Install the module:
Customise the edition contents, title and logo
Go to:
Setup → Edition settings → Advanced options
This section allows you to:
-
Display or hide the edition title
-
Upload a logo
-
Hide the default confirmation message if desired
For logos, we recommend:
-
Transparent PNG format
-
High quality but lightweight files
The logo will appear at the top of your event registration page.
You may also choose to hide the edition title if it conflicts with your design or background.
2.3 Configure theme colours
Theme colours are configured within your workflows.
Go to:
Setup → Workflows → Edit workflow
In the Action Centre, you can configure:
-
Primary colour
-
Secondary colour
-
Dark mode (optional)
You can:
-
Use default presets
-
Add your own HEX colour codes
Changes will update the appearance of:
-
Buttons
-
Interface highlights
-
Participant journey styling
⚠️ Important
Theme colours are configured per workflow.
This means you will need to update:
-
Registration workflows
-
Modification workflows
-
Any additional workflows in your edition
to ensure consistent branding.
2.4 Use custom fonts
To use your own font, install:
Custom font (front only)
Then go to:
Setup → Workflows → Edit workflow
Activate the custom font option and:
-
Upload a font file
or -
Add the font URL
You can configure:
-
Default font size
-
Button font size
-
Input font size
Once saved, the font will update across the front office.
3. Add custom messages throughout the registration journey
Messages allow you to display important information and branded content throughout the participant journey.
Go to:
Communication → Custom messages
Messages can be displayed in many areas of the registration experience.
Examples include:
-
Competition selection page
-
Competition ticket
-
Confirmation page
-
Registration journey steps
This is useful for:
-
Highlighting important information
-
Promoting offers
-
Sharing event instructions
-
Creating a more branded experience
3.1 Add a message
To create a new message:
Click:
Add message
Then configure:
-
Internal label
-
Display position
-
Style
-
Content
You can:
-
Format text
-
Bold or italicise
-
Centre content
-
Add images
-
Create styled message boxes
Messages can be edited at any time.
3.2 Choose where messages appear
When configuring a message, you can choose its display location.
Examples include:
-
Top of competition selection page
-
Competition ticket header
-
Confirmation page
-
Other registration stages
Each position creates a different participant experience.
Feel free to explore the available locations.
3.3 Restrict messages by competition or date
Messages can also be restricted.
You may define:
-
Competition visibility
-
Start date
-
End date
This allows you to:
-
Display temporary announcements
-
Target messages to specific competitions
-
Schedule promotions or event updates
Example:
A race pack reminder shown only during the final week before the event.
4. Customise wording using translations
The translation tool allows you to customise wording displayed to participants.
Go to:
Front office → Translations (top right - only visible if you access the page from your account)
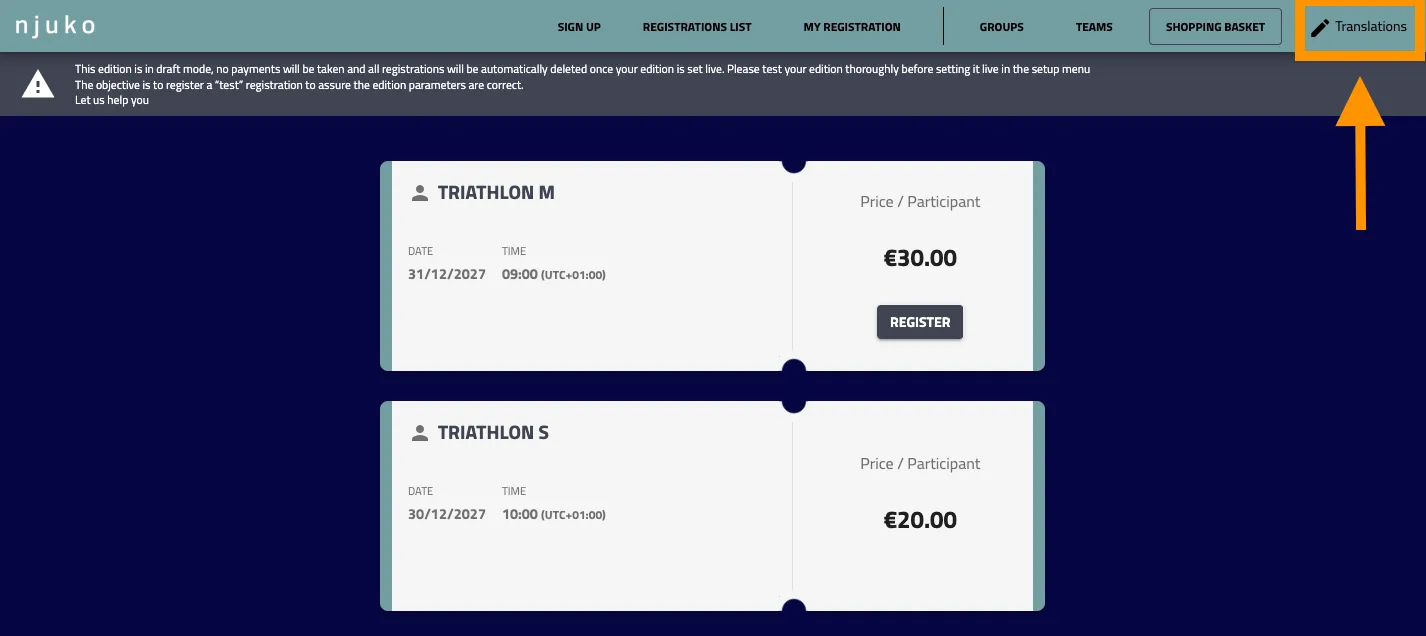
You can edit participant-facing wording such as:
-
Button labels
-
Instructions
-
Interface text
-
Competition wording
Examples:
-
Register → Sign up
-
Modify wording to match your event tone
-
Adjust terminology to suit your audience
This is a powerful branding tool.
4.1 Structure vs edition translations
When editing translations, make sure you select the correct scope.
You can translate:
Structure level
Changes apply across your structure.
Edition level
Changes apply only to the current edition.
Choose carefully before saving.
⚠️ Important
Translation overrides are extremely flexible but can become difficult to track if heavily modified.
Keep wording consistent and document significant changes where possible.
5. Advanced branding options
Additional modules provide even more control over the participant experience.
Many of these settings can be configured from:
Setup → Edition settings → Advanced options
Examples include:
-
Hide competition name
-
Customise front navigation
-
Hide Teams or Groups menu items
-
Show or hide competition information
-
Hide capacity or remaining places
-
Display or hide restrictions
-
Configure workflow-specific backgrounds
Some modules allow customisation:
-
For all competitions
-
Or only selected competitions
These tools make it possible to fine-tune how your edition looks and behaves.
6. Best practices
For the best branding experience, we recommend:
-
Keeping colours and fonts consistent across your edition and emails
-
Using lightweight, optimised images
-
Testing desktop and mobile display
-
Avoiding excessive translation overrides
-
Applying branding consistently across all workflows
-
Reviewing participant-facing pages before going live
Small visual improvements can significantly improve participant confidence and conversion.
7. Video guides
7.1 Customise your edition branding with background images, logos, theme colours and fonts
7.2 Customise your edition with messages, translations and advanced options
Related articles
👉 How to add custom banners, headers and progress bars
👉 Set up custom messages in the registration journey
👉 How to create and manage emails
Customising your edition allows you to create a registration experience that feels consistent with your event identity while improving clarity and participant engagement.
If you need help choosing the right branding options or configuring your edition, our team will be happy to help.