
Google Tag Manager Tracking - Preset data layer mapping
How to use our integration with Google Tag Manager (GTM) using the preset data layer mapping module.
This article will be useful to you if you are using our module “Google Tag Manager Tracking - Preset data layer mapping”:
1. What is Google Tag Manager
Google Tag Manager lets you manage all tracking tags (such as Google Analytics, Facebook Pixel, etc.) from a single interface. You can set up and manage your tags through the Google Tag Manager web-based user interface.
GTM can be compared to an advanced ‘camera system’ that observes visitors when they enter your store and notifies your ‘partners’ (such as Google Analytics, Google Ads, or Meta) about what those visitors do.
The integration supports the following platforms and capabilities:
-
Google Analytics 4 (GA4)
-
Google Ads Enhanced Conversions
-
Meta Enhanced Match (or Advanced Matching)
-
First Party data for Server-Side Tracking
The data layer acts as the single source of truth for all tracking. It ensures consistent data collection, long-term stability, and future-proof measurement.
Learn more about GTM here.
2. What Is the Data Layer?
The data layer is a structured JavaScript object that stores important business information about user actions on the website (for example: viewing a cart or completing a purchase).
Instead of reading information directly from the page, Google Tag Manager reads from the data layer, which makes tracking:
-
More reliable
-
Easier to maintain
-
Less fragile when the website changes
The njuko Data Layer responsibility is only to push data.
All analytics, advertising, and consent logic is handled inside Google Tag Manager.
3. Tracking Principles
3.1 Key Principles
-
The data layer is platform-agnostic but optimised for Google Analytics 4.
-
Google Tag Manager decides what data is sent where.
-
No GA4, Google Ads, or Meta logic should live in website code.
3.2 Draft / Live Filtering (isLive)
All events include an isLive flag. This allows you to filter events in draft mode.
-
“yes” event in production
-
“no” event in testing / staging
This allows GTM to block test data from analytics and advertising platforms.
4. Supported Platforms
This integration supports:
-
GA4 recommended ecommerce events
-
Google Ads Enhanced Conversions
-
Meta Ads Enhanced Match
-
Browser Google Tag Manager and the first party data collection required for successful Server-Side tracking.
5. Google Tag Manager Setup
5.1 Data Layer Variables
A Data Layer Variable must be created in GTM for every key defined in this specification. You can use the cheatsheet below for mapping variables into GTM which are compatible with the njuko Data Layer.
Steps to Create a Data Layer Variable:
1. Open Google Tag Manager
2. Navigate to Variables
3. Click New
4. Select Data Layer Variable
5. Enter the exact key path
6. Click Save
Cheatsheet for adding Data Layer Variables:
Each row below represents one variable that should be created in Google Tag Manager.
GTM Variable Name | Data Layer Key Path |
DLV – event | event |
DLV – isLive | isLive |
DLV – visitorType | visitorType |
DLV – visitorLoginState | visitorLoginState |
DLV – user id _ | user_id |
DLV – pageLocale | pageLocale |
DLV – transaction id _ | ecommerce.transaction_id |
DLV – value | ecommerce.value |
DLV – currency | ecommerce.currency |
DLV – tax | ecommerce.tax |
DLV – shipping | ecommerce.shipping |
GTM Variable Name | Data Layer Key Path |
DLV – coupon | ecommerce.coupon |
DLV – participants | ecommerce.participants |
DLV – affiliation | ecommerce.affiliation |
DLV – email | ecommerce.email |
DLV – firstName | ecommerce.firstName |
DLV – lastName | ecommerce.lastName |
DLV – payment _ type | ecommerce.payment_type |
DLV – shipping_ tier | ecommerce.shipping_tier |
DLV – items | ecommerce.items |
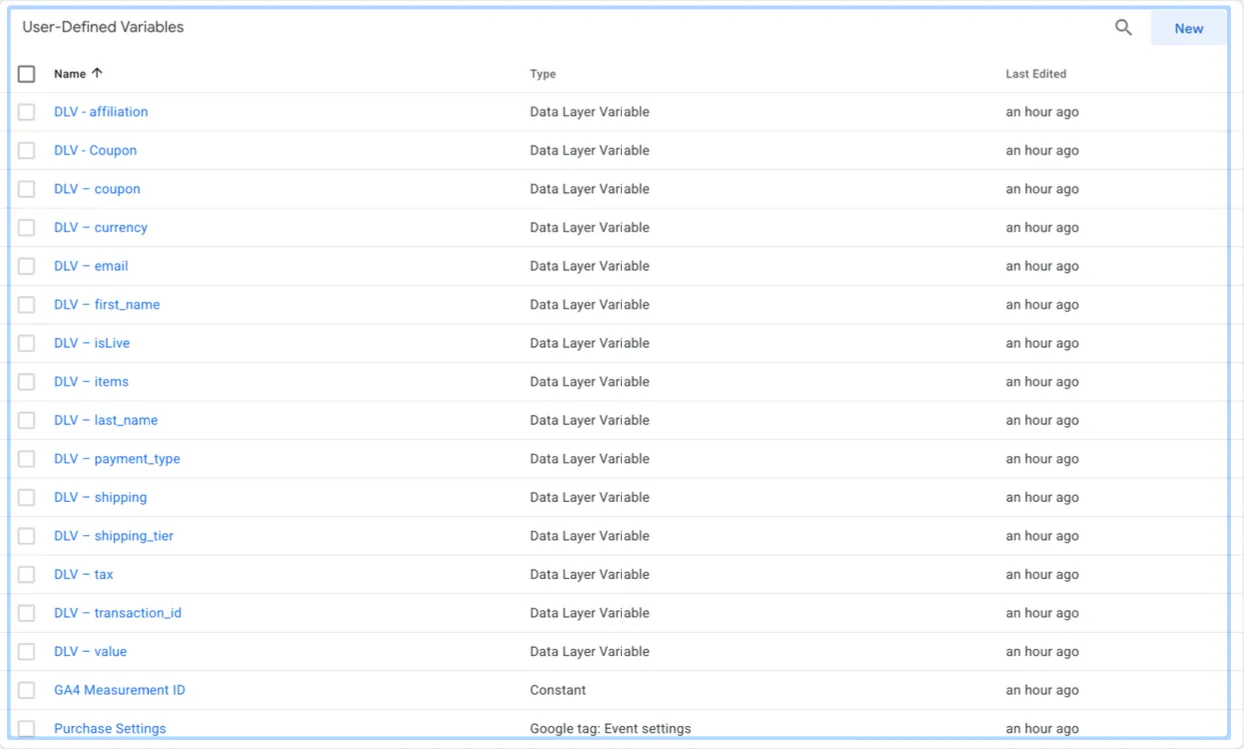
In Google Tag Manager you would end up with a large list of Data Layer Variables to choose from for your site tags:
5.2 Custom Event Triggers
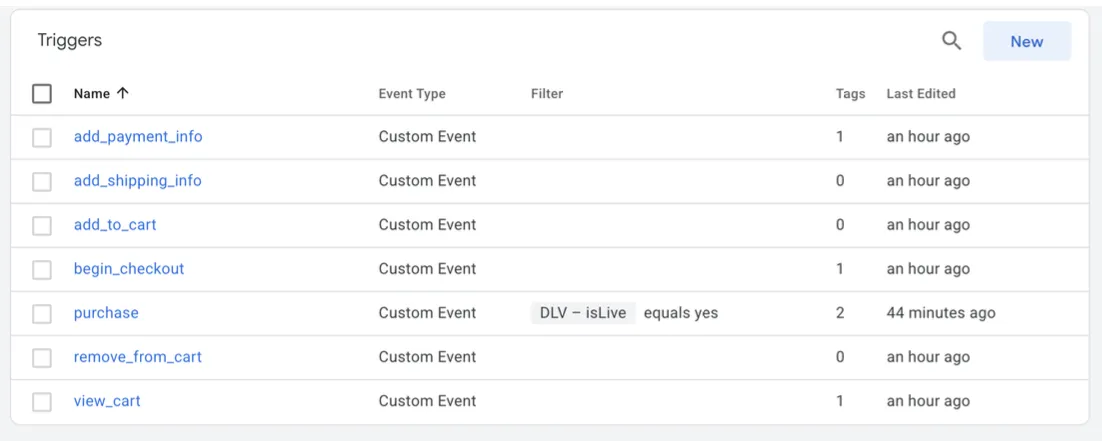
If you want to trigger a tag based on a data layer event such as ‘purchase’ then this requires a Custom Event Trigger. You can use the cheatsheet below to map the trigger as a custom event compatible with the njuko Data Layer below.
Steps to Create a Trigger:
1. Navigate to Triggers
2. Click New
3. Select Custom Event
4. Enter the event name exactly as it appears in the data layer
5. Add condition: DLV – isLive equals yes
6. Click Save
Cheatsheet for Data Layer Event names to be added as Custom Event:
Each row below represents one trigger that should be created in Google Tag Manager.
The data layer event name is case sensitive.
Trigger Name | Data Layer Event Name |
Purchase | purchase |
Select Item | select_item |
View Item | view_item |
View Item List | view_item_list |
View Promotion | view_promotion |
Select Promotion | select_promotion |
Generate Lead | generate_lead |
Search | search |
Refund | refund |
In Google Tag Manager, the trigger should be configured as shown in the screenshot. To distinguish between draft and live events, a filter can be applied using the ‘DLV – isLive’ event, setting it to equal ‘yes’.
Using the Data Layer to Segment Events in Google Tag Manager
In some cases, you may want to trigger events based on specific conditions, for example, firing a purchase event only for a certain ticket type or only when the event is live.
By exposing multiple variables in the data layer, you gain flexibility to segment, filter, and trigger tags based on those values.
6. Non-Ecommerce Events
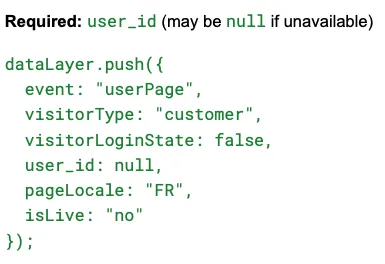
6.1 User Page (Persistent Event)
This event will fire across all pages of the platform.
7. Ecommerce Events
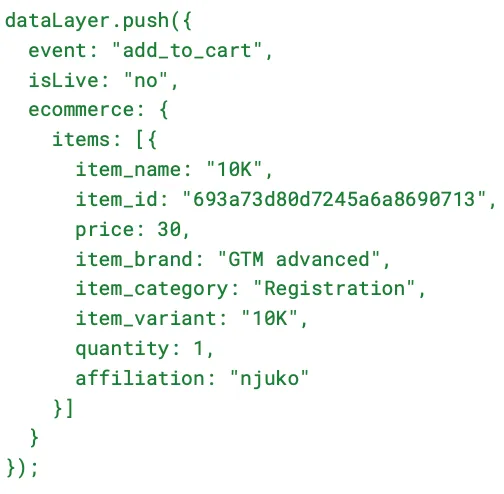
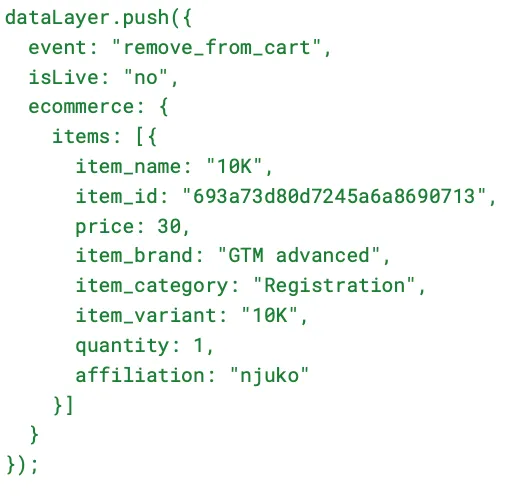
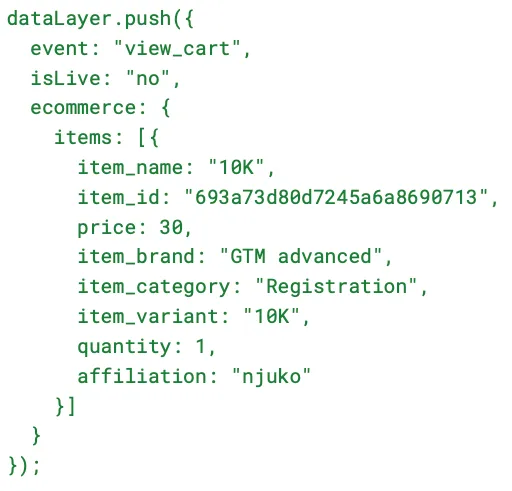
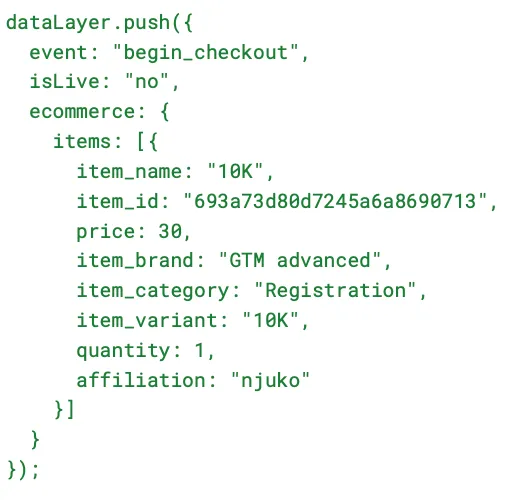
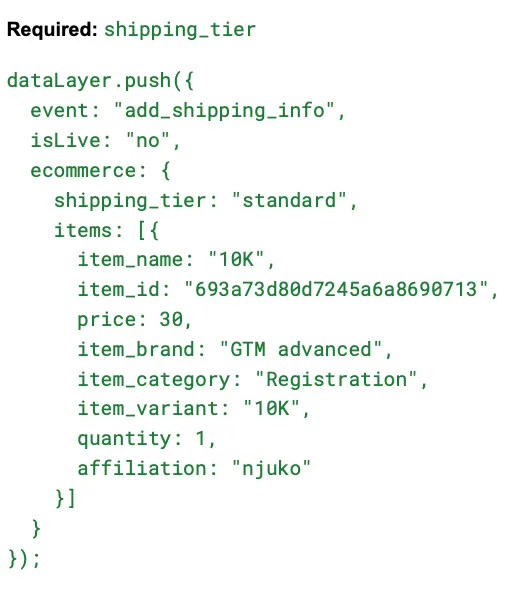
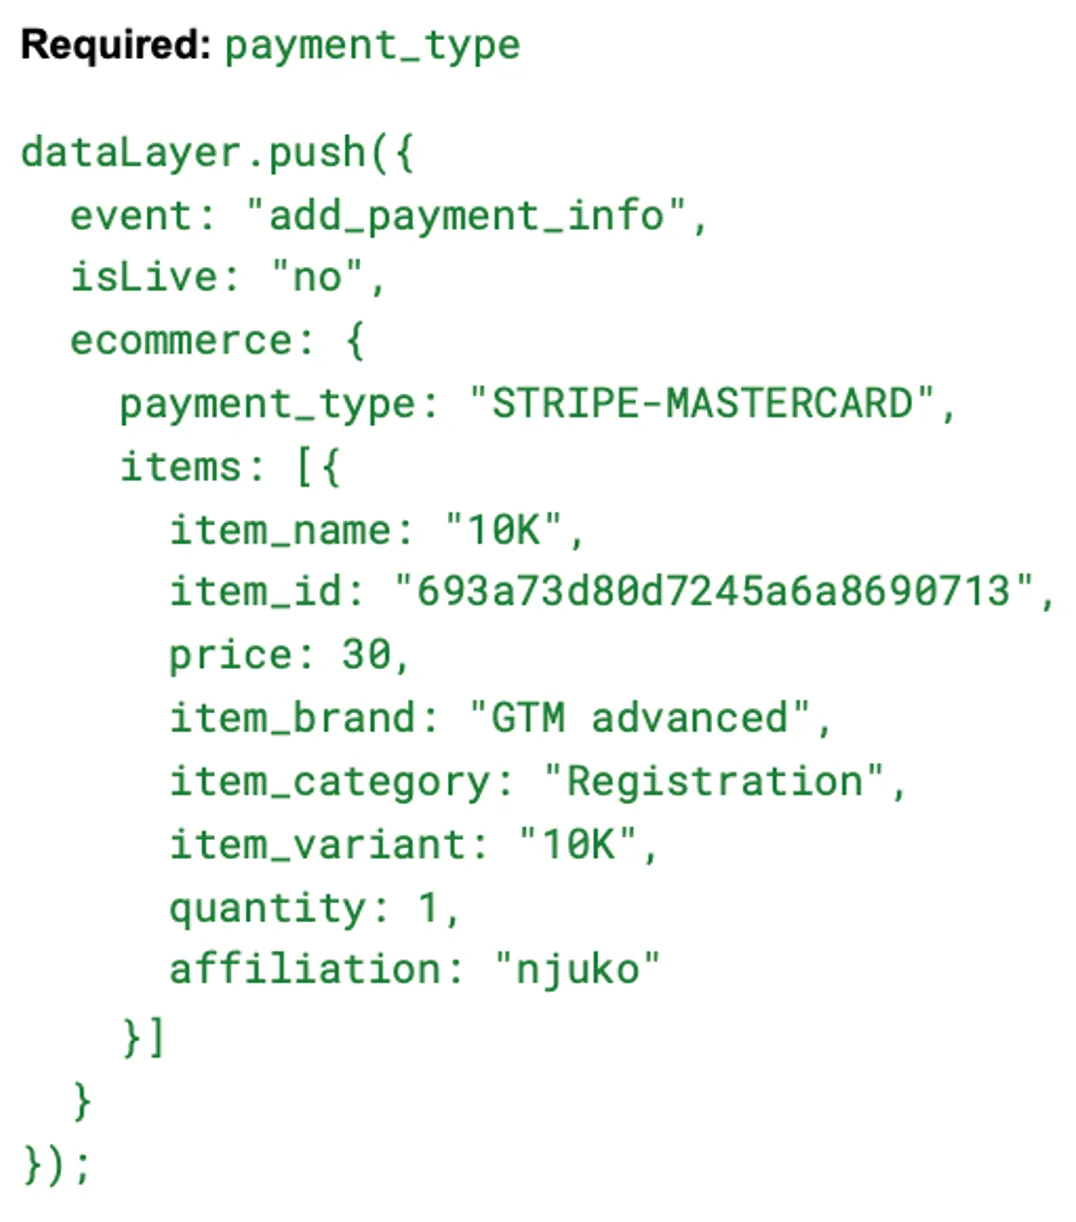
The dataLayer object name and all keys are case-sensitive.
Always use dataLayer.push().
7.1 Add to Cart
7.2 Remove from Cart
7.3 View Cart
7.4 Begin Checkout
7.5 Add Shipping Info
7.6 Add Payment Info
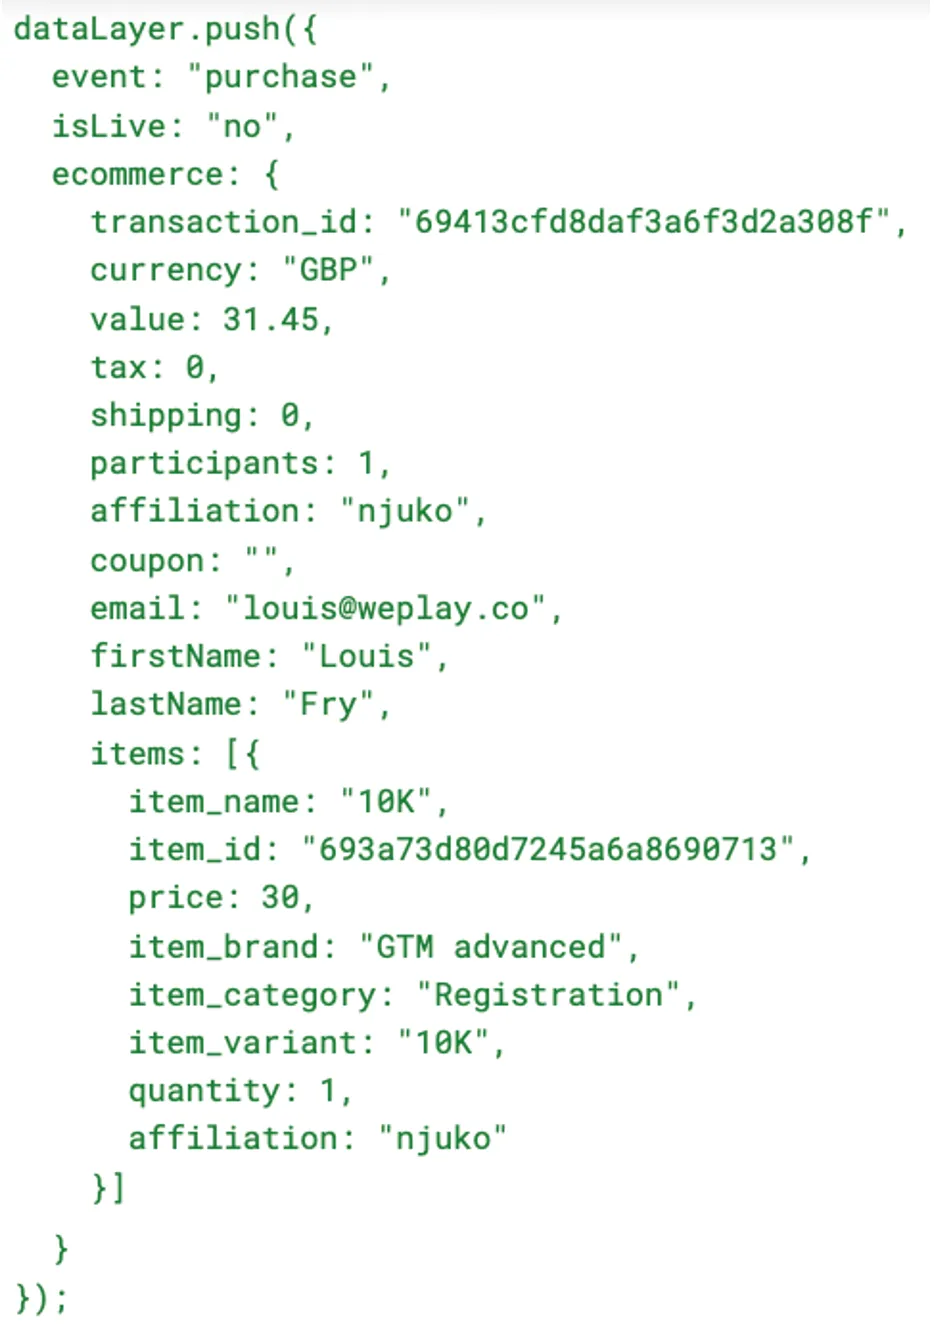
7.7 Purchase
Rules
-
Must fire once only
-
transaction_id and currency are required
-
quantity must be an integer
-
First-party fields are used for Enhanced Conversions / Match only
8. GA4 Funnel Configuration: Key Considerations
The njuko data layer provides the necessary events for building your user funnels, but the funnels themselves are created and managed within your analytics tools such as GA4.
Important Notes on Event Behaviour:
- Some e-commerce events, such as add_to_cart, are expected to fire multiple times within a single user session. This accurately reflects typical user actions (e.g., adding several items or adjusting quantities).
Recommendations for Clean Conversion Funnels:
-
Entry Point: Use the begin_checkout event as the initial step for clean conversion funnels.
-
add_to_cart**:** Treat the add_to_cart event as a behavioural indicator rather than a mandatory, strict gate in the conversion funnel.
-
Accuracy: Employ closed funnels when precise step-to-step conversion measurement is required.