
How to set up the waiting list module
Activate a waiting list and invite participants to register when places become available.
The waiting list module allows you to collect registrations once a competition reaches capacity (or a specific activation date). You can then invite participants to claim a place within a configurable time limit.
Each participant is assigned a position in the waiting list, and you can manually invite them to register.
1. Install the module
Go to the Store, search for Waiting list, and click Install.
Once installed, a new Waiting list section will appear in Registrations.
2. Enable the waiting list on a competition
-
Go to Setup → Competitions
-
Edit your competition
-
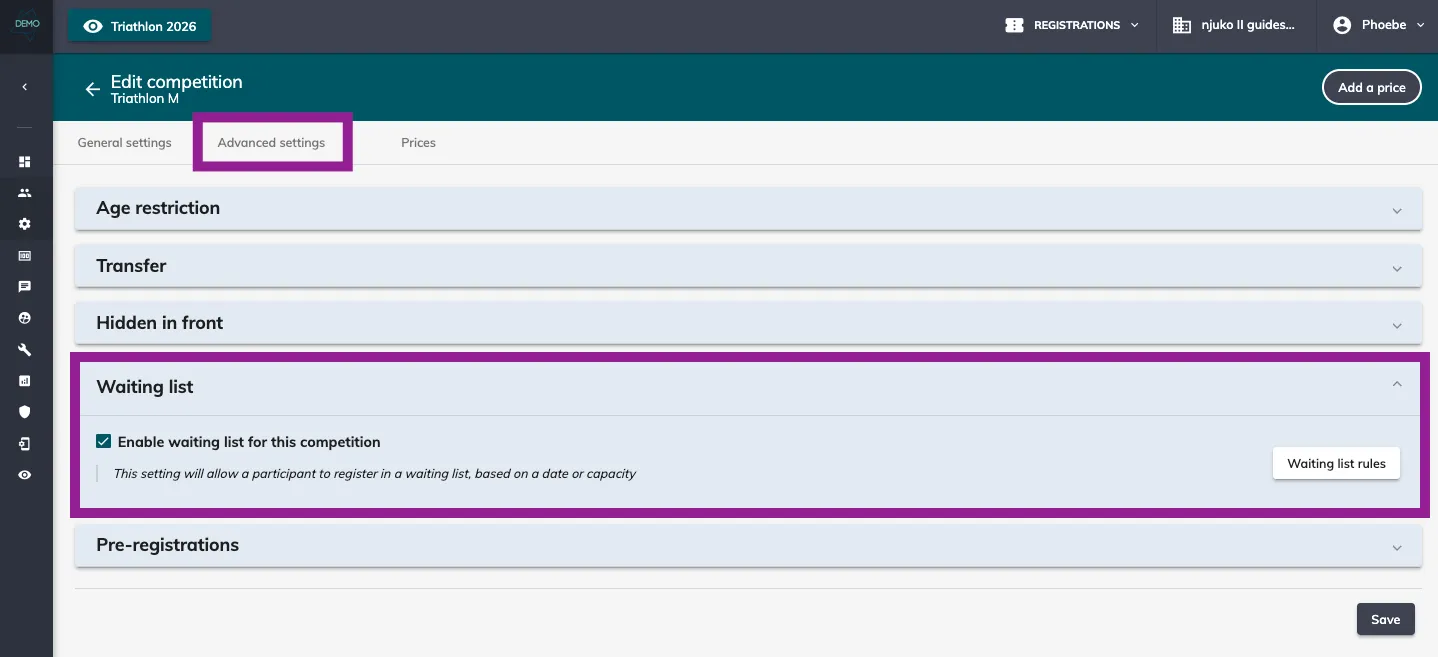
In Advanced settings, enable Waiting list for this competition
-
Click Waiting list rules
3. Configure the waiting list rules
You can configure:
3.1 Activation method
Choose when the waiting list becomes available:
-
When the capacity is reached
-
On a specific activation date
You can also optionally set a closing date.
⚠️ Important:
The waiting list will only be active if a capacity is set on the competition, even if you choose activation by date. Without a configured capacity, the waiting list will not activate.
3.2 Waiting list price
Participants can:
-
Join for free (most common)
-
Pay to join the waiting list
If the waiting list is free, set the price to 0 (the price must exist beforehand in your competition’s Prices list).
Participants will still pay the competition price when they confirm their registration.
3.3 Invitation expiration time
Define how long participants have to claim their place after being invited:
-
X Hours
-
X Days
-
X Months
After this deadline, the invitation link becomes invalid.
3.4 Invitation trigger options
-
Manual: you manually select which participants to invite and send the invitation.
-
Automatic: invitations are sent automatically as soon as a place becomes available in the competition.
Automatic invitations can be triggered when:
-
A participant cancels their registration
-
The competition capacity is increased
-
A participant transfers to another edition
-
A participant changes competition
This ensures that waiting list participants are notified promptly whenever a spot opens, keeping your registration process efficient and fair.
3.5 Replacement notification email
Purpose:
This email is sent to a participant who has cancelled their registration, once someone from the waiting list has claimed their spot. It informs them that their place has been filled and confirms that any automatic refund has been triggered (if enabled).
Workflow:
-
Automatic refunds must be enabled for cancellations where the freed place is claimed by someone else.
-
The participant is registered for a competition.
-
They cancel their registration from their dashboard.
-
A participant from the waiting list is automatically invited to claim the freed spot via the waiting list invitation email.
-
The waiting list participant registers for the competition.
-
The original participant who cancelled is notified by the Replacement Notification Email that their spot has been taken and, if applicable, the refund is processed.
Notes:
-
This email only triggers when the cancelled place is successfully filled by someone from the waiting list.
-
It ensures participants are informed and refunds are handled automatically without manual intervention.
Click Save.
4. Create the required emails
Go to Communication → Emails and create two emails.
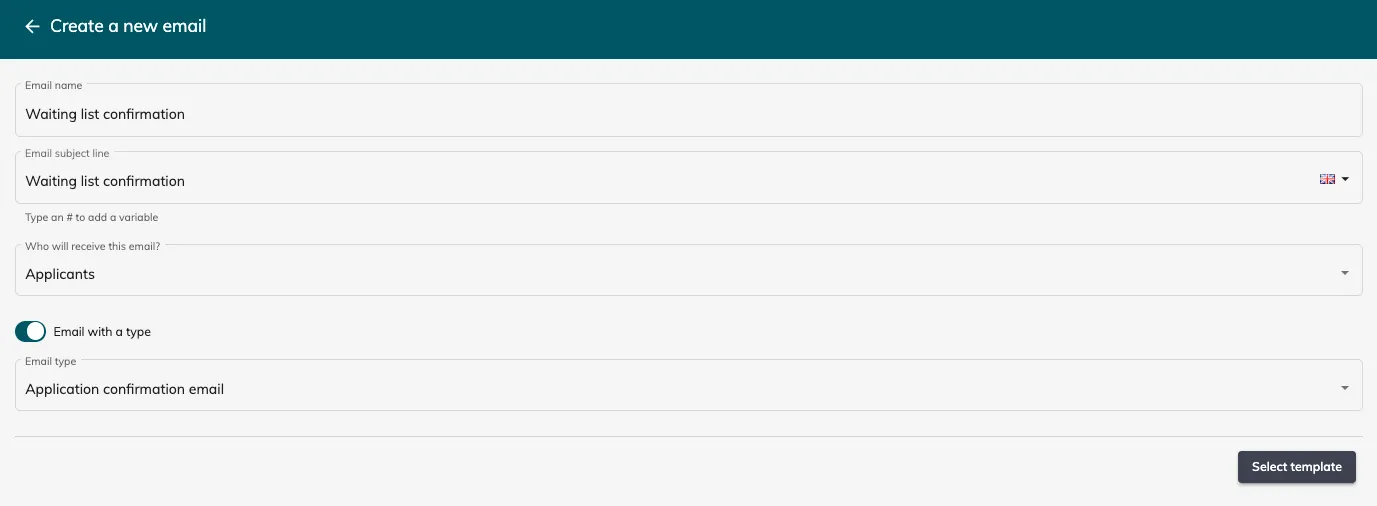
4.1 Waiting list confirmation email
-
Recipient: Applicants
-
Type: Application confirmation email
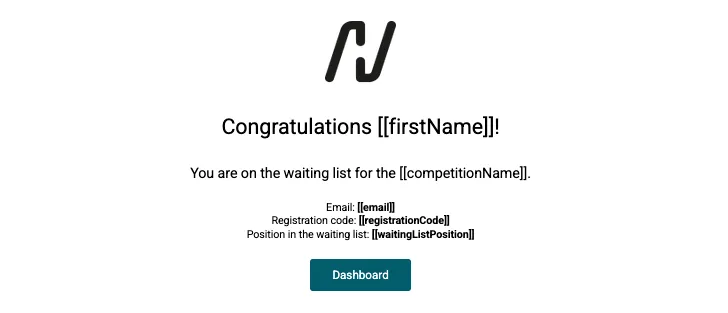
This email is sent when participants join the waiting list.
Useful variables and links:
-
Waiting list position → shows the participant’s position when the email is sent
-
Link to application dashboard → if you have created an applications dashboard you can add a button linking to it
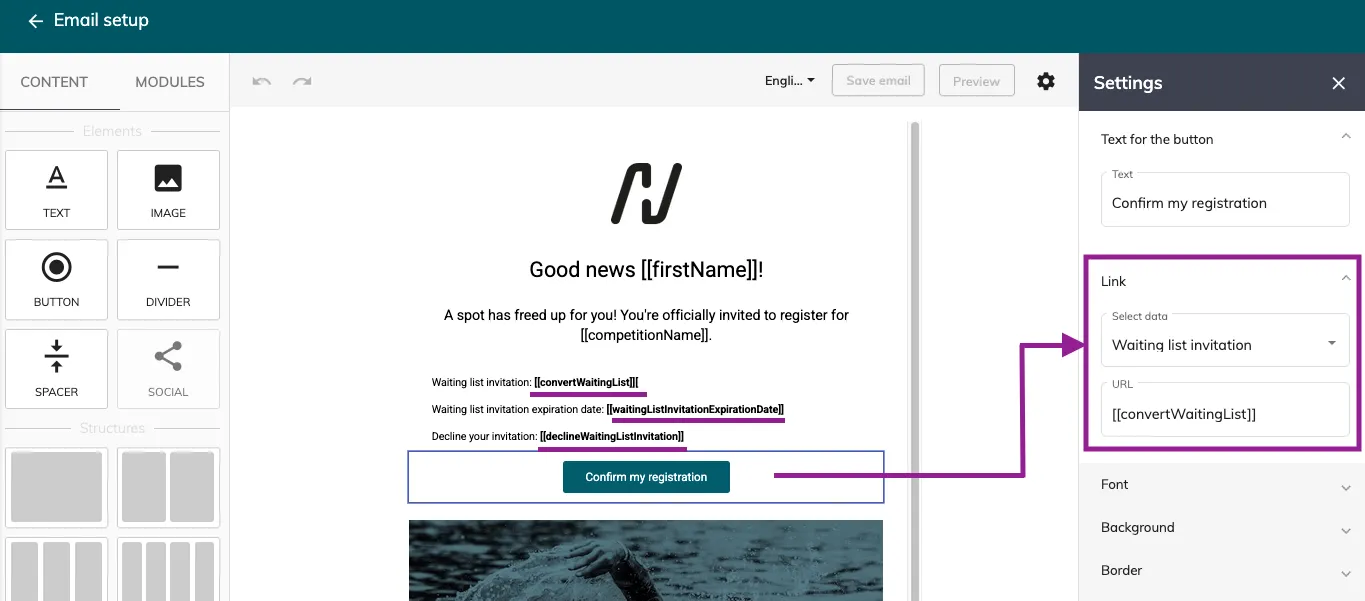
4.2 Waiting list invitation email
-
Recipient: Applicants
-
Type: Waiting list invitation
This email is sent when applicants are invited to register.
Add:
-
A button linking to Waiting list invitation
-
Optional variables:
-
Waiting list invitation expiration date to show the deadline
-
Decline waiting list invitation
-
Waiting list invitation URL
-
5. Update the registration workflow
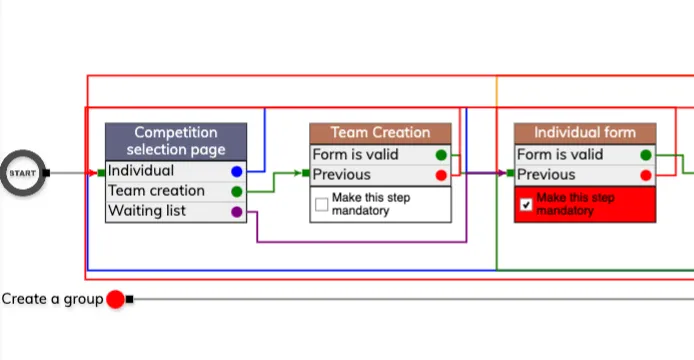
Go to Setup → Workflows and edit your registration workflow.
In the Competition selection page box, you will see a new Waiting list line.
Connect:
Waiting list → Individual registration form
Click Save.
6. Hide fields for waiting list registrations
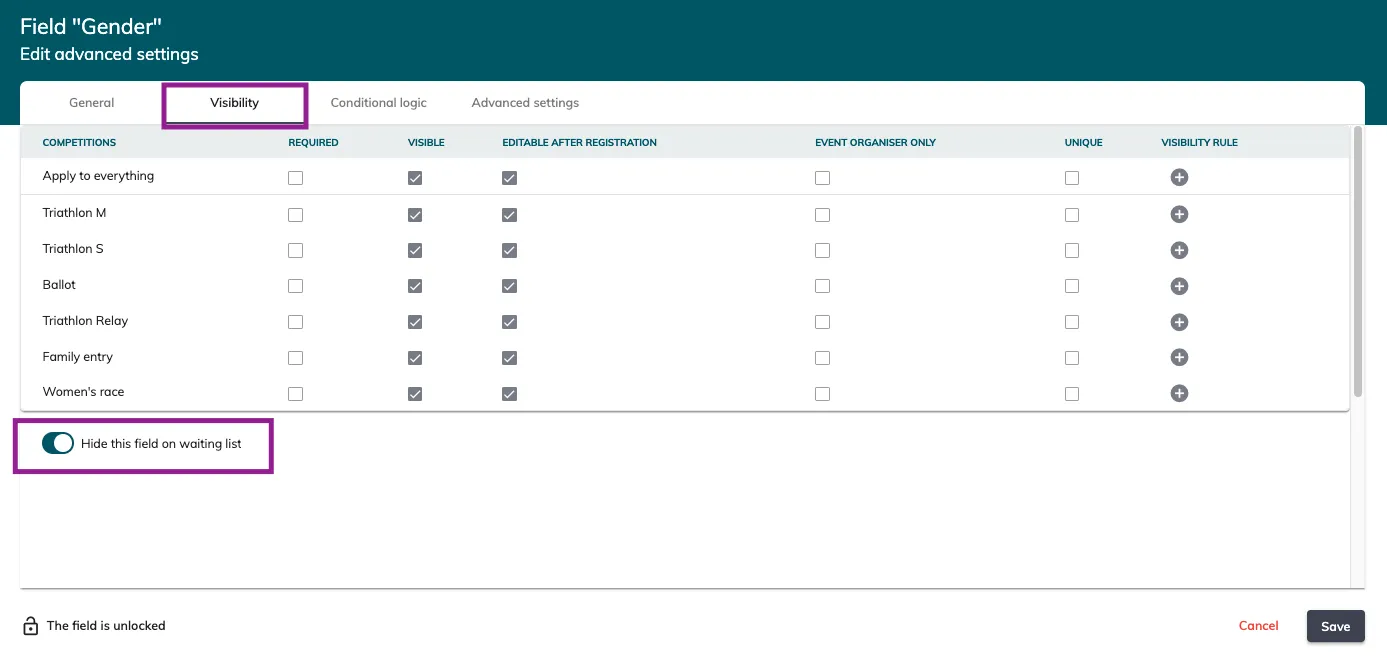
Waiting list registrations use the individual registration form and all other forms in your workflow.
You can hide specific fields:
-
Go to Setup → Forms
-
Edit your form field
-
Open the Visibility tab
-
Enable Hide this field on waiting lists
-
Save
This is useful for shortening the waiting list form.
Tip: It’s easier to configure this while building your forms, but you can also update it later.
7. Manage your waiting lists
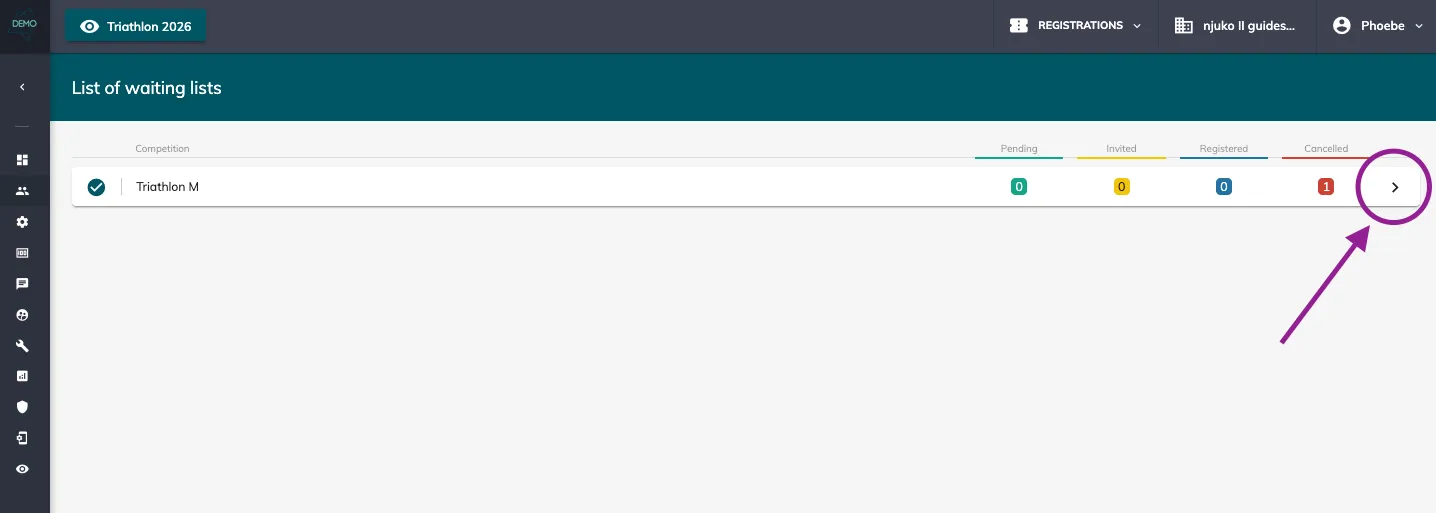
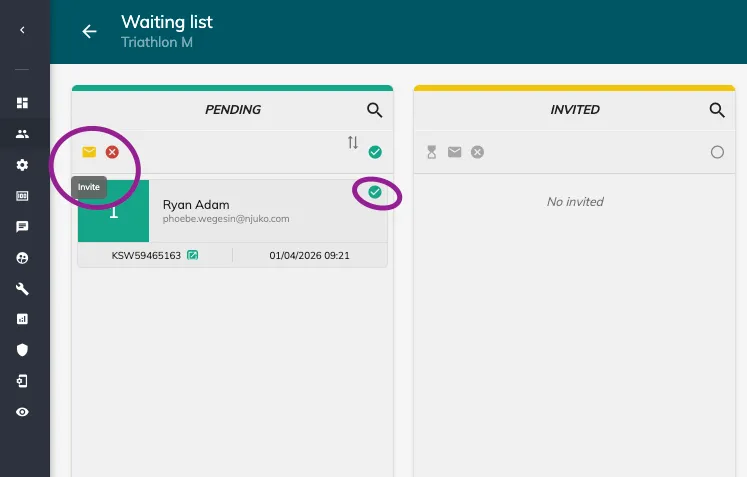
Go to Registrations → Waiting list
You will see all competitions with an active waiting list.
Click the arrow next to a competition to open the management interface, where participants are organised into:
-
Pending
-
Invited
-
Registered
-
Cancelled
8. Invite participants from the waiting list
-
Select one or more participants
-
Click Invite
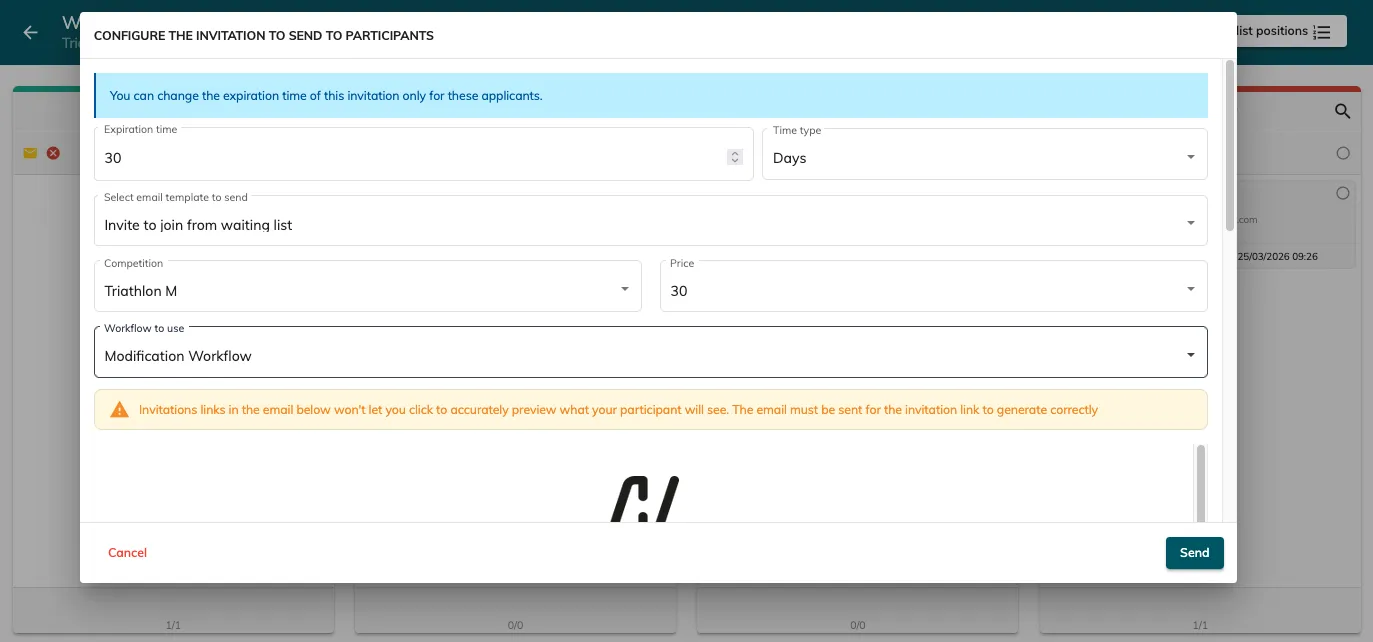
-
Configure:
-
Expiration time (optional override)
-
Email template
-
Registration price
-
Modification workflow
-
-
Click Send invitation
Participants will receive an email and can claim their place.
Important: invited participants register through a modification workflow, not the standard registration workflow.
9. Participant experience
When the competition is full:
-
The Waiting list button appears
-
Participants complete the registration form
-
They join the waiting list
-
They receive the waiting list confirmation email (including their position if you included this variable)
-
When invited, they receive a link to claim their place
You can also create a specific waiting list confirmation message to be displayed when their registration to the waiting list is complete (in Communication → Custom messages).
10. Video guide
Important notes
-
Waiting lists are available only for individual competitions
-
You can base activation on capacity or date
-
You can invite multiple participants at once
-
You can manually cancel participants from the waiting list
Optional: Pre-registration module
If you install the Pre-registrations / Ballot application module, you can:
-
View waiting list participants in Registrations → Applications
-
Create a dedicated dashboard for waiting list participants Tools → Dashboards → Applications
-
Display widgets in this dashboard such as waiting list position or invitation expiry
If you need further help configuring your waiting list, our team will be happy to assist you.