
How to create start waves
Create and manage start waves for your participants, with optional self-selection for individuals and teams.
Start waves help you organise participant departures, control capacity, and improve race-day flow.
You can create and allocate start waves directly in njuko without any additional modules.
However, if you would like participants or teams to choose their own start wave during registration, additional modules are required.
1. What are start waves?
Start waves allow you to split participants into separate departure groups based on time slots, capacity, competition, category, or custom rules.
They are commonly used for:
-
Large participant volumes
-
Safety and congestion management
-
Competitive seeding
-
Team departures
-
Time-slot based starts
2. Create a start wave
Go to:
Registrations → Start waves → Add a start wave
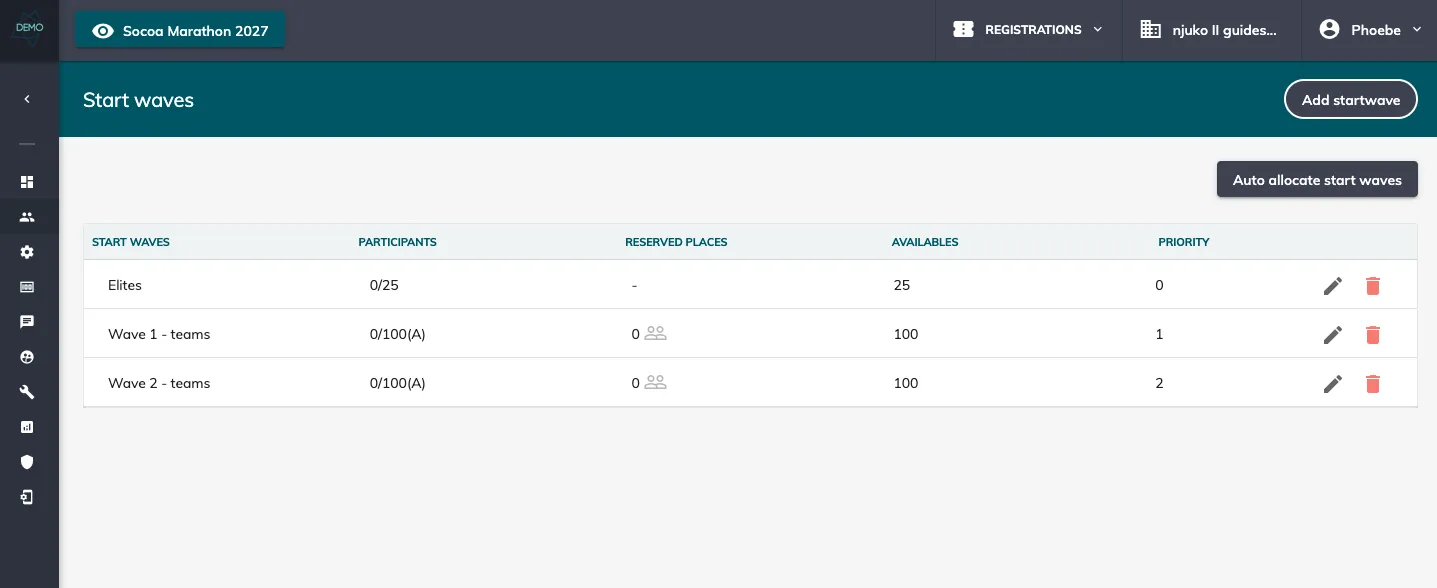
In the General tab, configure:
-
Title
-
Report name
-
Maximum number of registrations allowed in the wave
-
Allocation method: Manual or Automatic
-
Optional additional price
-
Priority order (used for automatic allocation)
-
Eligibility filters
Typical filters include:
-
Competition
-
Group members
-
Registration date
-
Answers to form questions
-
Metadata conditions
-
Then click Save.
You can create as many start waves as needed.
3. Automatic allocation
Once your waves are ready, click:
Auto allocate start waves
The system will allocate participants automatically based on your configured rules, priorities, and remaining capacity.
This is ideal for large events where manual allocation would take too much time.
4. Allow participants to choose their own wave
If you want participants to select a start wave during registration, install the module:
Form field – Start wave manager
This module allows you to add a Start waves field to your registration form.
Setup steps
Install the module, then go to:
Registrations → Start waves → Add a start wave
Create your waves first.
Then go to:
Setup → Forms → Edit Individual registration form
-
Click Add a field
-
Select Basic field
-
Choose Start waves
-
Click Save
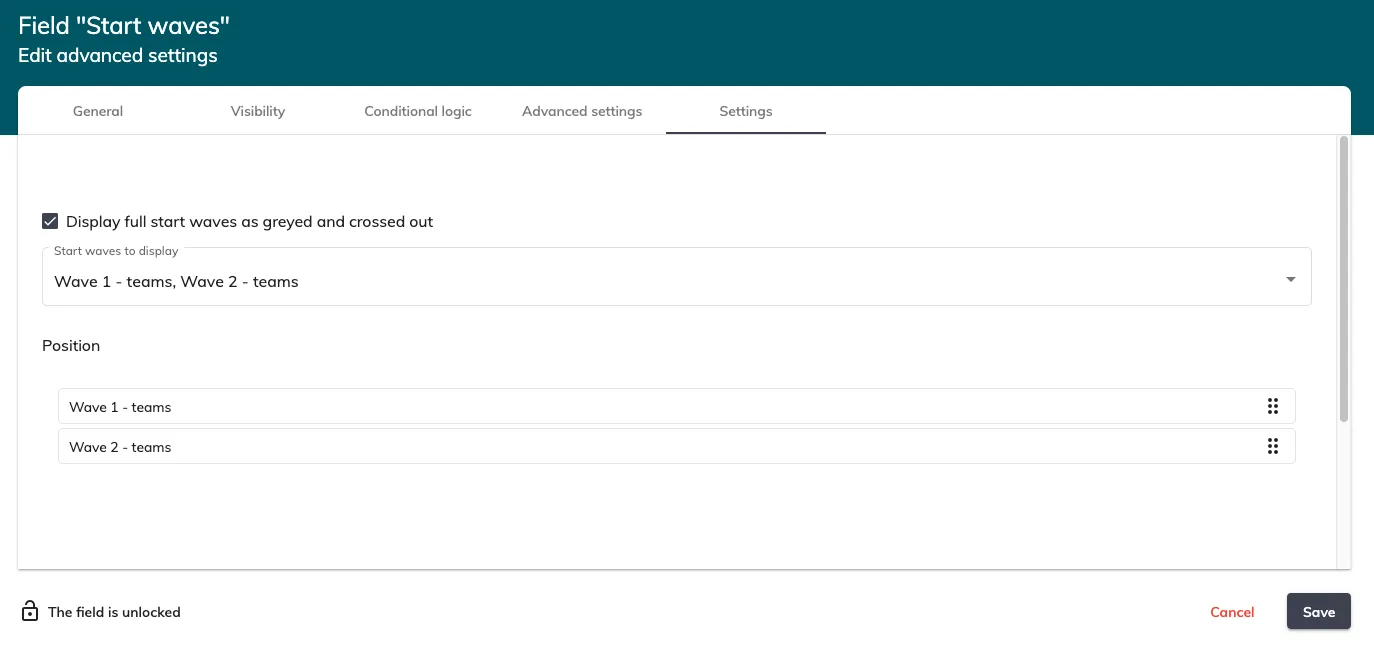
Then edit the field:
-
Open the Settings tab
-
Select which start waves to display
-
Adjust display order if needed
-
Click Save
Participants will then be able to choose from the available waves during registration.
5. Allow teams to reserve start waves
If you have team competitions and want teams to choose or reserve a wave, install the module:
Team wave reservations for start waves
This module allows team-based wave reservations.
Setup steps
Install the module, then go to:
Registrations → Start waves → Add a start wave
In the General tab, complete the wave settings.
Then open the Team waves tab:
-
Activate team reservation for this wave
-
Set the reservation duration
-
Save
Then go to:
Setup → Forms → Edit Team creation form
-
Add a Basic field
-
Select Start waves
-
Save
Then edit the field:
-
Open Settings
-
Select the waves to display
-
Save
Teams will then be able to reserve their wave during team creation.
6. Display start wave information
6.1 In emails
You can add the variable: StartWave
This allows you to display the participant’s allocated wave in confirmation emails, race information emails, and reminders.
6.2 In participant dashboards
You can also show start wave information using a Content widget in the participant dashboard.
This is useful for allowing participants to easily check their departure wave before race day.
7. Best practices
-
Finalise your wave capacities before opening registrations
-
Use automatic allocation for large events
-
Use clear naming (e.g. Wave A – 09:00)
-
Include wave details in pre-race emails
-
Display start waves in the participant dashboard
If you would like advice on the best wave strategy for your event, our team will be happy to help.